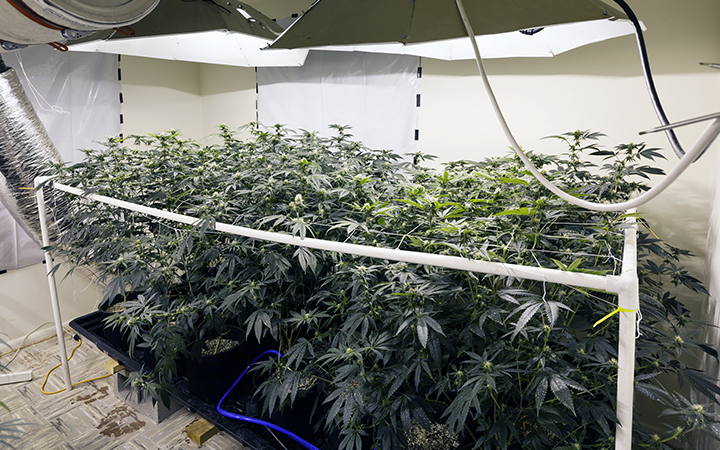
Wondering how you can get started with growing marijuana indoors? Good thinking! Doing so actually has many advantages over buying; for example, you won’t have to rely on anyone supplying you or spending a lot more money on buying it in your local dispensary. Also, if you think that the whole idea is too risky, take a look at the current legal status of marijuana in the U.S. by state and you’ll see that it steadily becomes legal around the country.
Besides, growing marijuana indoors is relatively easy because the plants can produce a nice yield good for weed edibles and smoking even in not-so-perfect conditions, which is great for beginners.
So, if this sounds good, remove any fear you may have and check out the steps needed to grow cannabis plans indoors and get a great harvest.
Step 1. Designate a Special Space for Growing
A suitable space for growing marijuana indoors doesn’t have to be a special “grow” room. It can be a cabinet in your garage, a spare room, a closet, or even a corner in your basement.
Tip for beginners:
Start small because it’ll be easier to grow and your mistakes as a beginner won’t be as costly
Make sure the space is sanitized
Choose a cool, dry area because it allows better temperature and humidity control.
Step 2. Choose Proper Grow Lights
You’re growing your marijuana plants indoors, but you can’t leave them sitting in your window for the whole neighborhood to see. However, you still need to provide quality lighting because it’s critical for the plants.
The list of the most common cannabis grow lights includes:
HID (high intensity discharge) lights (cost about $80)
Fluorescent lights (good options can be found in $20 – $70 price range)
LED lights (superb lighting units can be bought between $50 and $100)
Induction lights (cost about $40).
All of these options work well for growing marijuana. The best advice that anyone who has ever grown marijuana can give you is to choose the best setup you can afford because a quality lighting is a strong predictor of a good harvest.
Step 3. Keep Air Fresh
To ensure that your cannabis plants get the fresh air they need, you have to employ an exhaust fan and an activated carbon filter. For example, the fan placed at the top of the room will create a constant light breeze in the room, which, in turn, will create a less hospitable environment for pests and mold and strengthen the stems of your plants. The filter will remove the typical strong cannabis smell so your neighbors won’t have to smell it.
Step 4. Automate Your Equipment
Since you’re probably not spending a lot of time in the grow space, automating lighting and temperature equipment is a good idea. First, the plants will need between 16 and 24 hours of light while in the vegetative growth and then 12 hours in the blossoming period. To automate this task as well as air conditioning, you can use a timer, but experts recommend buying a thermostat to avoid unnecessary issues.
Step 5. Put Plants into Pots
When the plants enter the germination stage, you’re getting really close to the flowering. But before you start harvesting and learning how to make hash and other marijuana products, you need to put them into pots directly below the lighting equipment and keep them there for about 3 – 4 weeks (depends on the strain).
Step 6. Start Flowering
That’s when you switch to 12/12 lighting cycle. At this point, plant growth will slow down and the buds will begin smelling very strongly. When the trichomes – icy, sticky things covering the buds – change their color, it’s a strong indicator that they’re ready to harvest.
Things to Remember
Soil. – If you’re a beginner, organic pre-fertilized soil that doesn’t need additional nutrients should do fine.
Seeds. – Getting good marijuana seeds shouldn’t a problem because they can be easily bought online or in your local dispensary. Since only female plants produce buds, plant at least 5 seeds to get at least several females.
Water. – There’s no universal formula for watering, but many growers recommend to water cannabis plants until the topsoil feels dry about an inch.


